Move the light, then check what the photograph cannot change
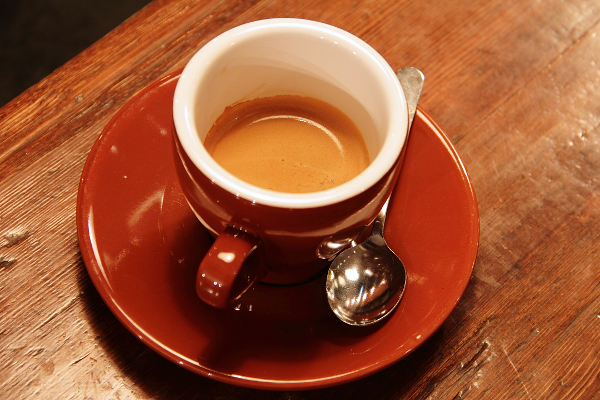
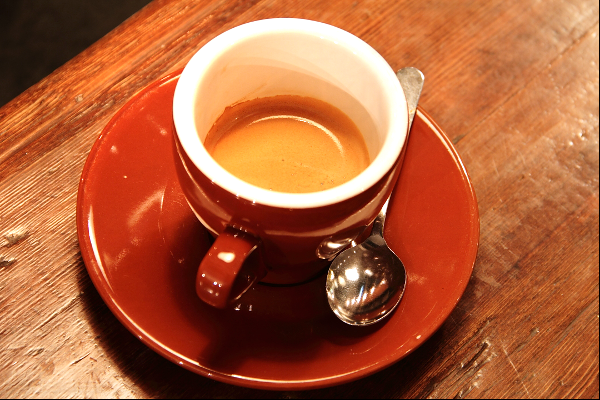
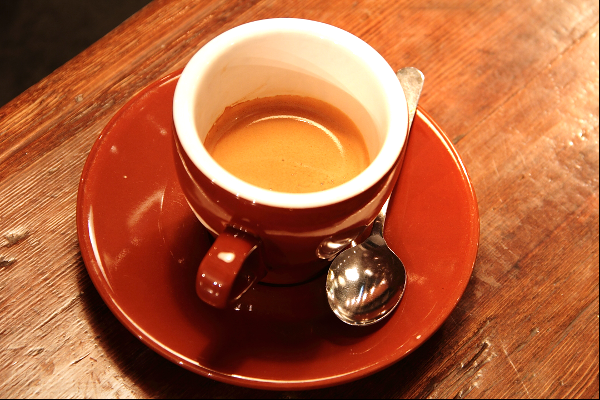
White porcelain, reflective metal and wood make this coffee photograph useful for questioning a relighting result. Three production-browser exports reveal a directional change, over-bright highlights and a small black-edge defect. They also expose a mismatch between the initial slider display and the renderer’s internal strength.
The session ran on the public Photo Relighting page in the Codex in-app browser on macOS arm64, around 13:23–13:25 Asia/Shanghai. The canvas and source were 600 × 400 pixels. The recorded pointer positions were (115, 77) and (481, 77), read from the pointer’s DOM style. These are image coordinates, not physical light angles. Color stayed at default opaque white, RGB 255/255/255.
The first two exports only moved the pointer. The slider displayed 0.30, but source review found an internal initial strength of 0.40, unsynchronized until the slider changed. We did not capture the shader uniform directly: 0.40 is a source-based inference. The third export followed an explicit 0.70 adjustment. Filenames retain the original displayed-value labels.
The implementation predicts 224 × 224 depth and renders a WebGL mesh. Files came directly from the download button without image edits. The session window does not measure inference speed.
1. Left light: lift the wood without moving its shadows
The left-hand treatment lifts the left tabletop and saucer, while the cup interior and porcelain rim also brighten. Wood grain remains recognizable. Yet the broad shadow beneath the service and the spoon’s reflection pattern remain attached to the original photograph. This is useful creative emphasis, but it does not show that the scene was reconstructed under a new physical light.
2. Right light: direction changes more than the whole-image average
With the initial strength unchanged, the right tabletop receives more light and the far-left tabletop receives less than in the previous export. In the published left-table measurement box, mean RGB increases are 15.39 code values for left light and 5.40 for right light. In the right-table box they are 8.93 and 25.21. These encoded-pixel measurements confirm a spatial change; they do not measure exposure stops or lighting accuracy.
RIGHT, EXPLICITLY SET 0.70 · white RGB 255/255/255 · pointer (481, 77) · 600 × 400 px · Download original file
Keeping the right pointer fixed and raising strength to 0.70 makes the tabletop and orange-red saucer more emphatic. The white rim and bright cup interior lose tonal separation. The spoon keeps its source reflections, and the underlying shadow remains. For a product brief requiring restrained highlights and faithful color, reject this setting. More intensity has not supplied missing material or lighting information.
Endpoint counts in the untouched files; pointer coordinates are image pixels
File / setting
Pointer x, y
Any RGB channel = 255
All RGB channels = 255
Source photograph
—
0.43%
0.00%
Left, display 0.30 (source: 0.40)
115, 77
13.18%
2.50%
Right, display 0.30 (source: 0.40)
481, 77
13.57%
2.38%
Right, explicitly set 0.70
481, 77
27.87%
3.74%
A value of 255 counts an encoded channel endpoint. It does not prove every counted pixel is a newly clipped or objectionable highlight. Here, the rise from 0.43% in the source to 27.87% at 0.70 accompanies the visible loss of separation and gives the reviewer a reason to inspect the rim closely.
A one-pixel edge is still an export defect
All three PNGs are fully opaque, but their final row and rightmost column are solid black: 999 pixels, or 0.41625% of each image. Excluding that border, no RGB channel in these three outputs falls below its corresponding source value. The treatment therefore adds brightness in this sample; it does not replace the original illumination. The black boundary fails a clean, edge-to-edge product-image delivery check. We retain it in the downloads so the defect remains inspectable.
Repeat the comparison and make a delivery decision
To repeat this historical sequence, upload the original and move the pointer without touching the initial slider, then explicitly set 0.70 at the right position. A later initialization fix may change that sequence. For new comparisons, explicitly set and record strength first. Reject merged highlights, contradictory shadows, misleading product color or visible export edges.
Download the measurement script, coffee.png and all three named output files into one folder. With Python, Pillow and NumPy installed, run python measure-artifacts.py. It reads the files without rewriting images and reproduces hashes, dimensions, endpoint counts, region comparisons and border checks. This is one controlled source comparison, not a benchmark across subjects or devices.
Images with a clearly visible subject and moderate exposure provide the model with useful shape information. Deeply clipped shadows contain little detail, while blown highlights cannot reveal their original surface texture. A neutral, evenly exposed source offers more room for controlled changes.
02
Choose one dominant light direction
Move the light gradually and observe the forehead, nose, cheek, chin and product edges. Strong conflicting directions can produce a synthetic look. If the original background contains obvious sunlight or lamps, align the new treatment with that environmental evidence.
03
Protect skin and materials
Skin should retain texture without plastic highlights. Glass, metal and glossy packaging need sharper reflections than fabric or matte paper. Review whether the relighting changes perceived color or creates halos around the subject boundary.
04
Separate correction from creative grading
Relighting, exposure correction and color grading solve different problems. First make sure the source has usable brightness and neutral color. Then adjust the apparent light direction with restrained intensity. Apply an overall creative color grade only after the spatial lighting looks coherent. Combining all three changes at maximum strength makes it difficult to identify why skin, shadows or product colors feel wrong and often produces an effect that is dramatic but not believable.
05
Evaluate at final size
A dramatic effect that looks impressive when zoomed out may reveal broken shadows at full size. Compare before and after, reduce the effect if necessary, and export only after checking the final crop used by the website, presentation or social post.
REFERENCE
Frequently asked questions
Can relighting recover detail from pure black?
No. It can estimate appearance but cannot recover information that was never captured.
Why do edges glow?
A strong lighting change can expose segmentation or blending errors around the subject.
Does it replace studio lighting?
It is useful for experimentation, but critical commercial photography still benefits from controlled physical lighting.
Can I relight product photos?
Yes, especially when material reflections and brand colors are reviewed carefully.
Earlier test record, files and measurements
HISTORICAL ARTIFACT REVIEW
Lighting changed without a hidden-scene claim
The source and processed image keep the same portrait and street composition. The output shifts local brightness and warmth, especially across the face and background lights. It demonstrates a presentation edit, not reconstruction of the scene's original illumination.
The exact generation runtime for this historical pair was not recorded. The separate September 7 case linked under Workflow documents the current model and runtime fingerprints.
OBSERVED MEASUREMENT
Mean luminance +1.4/255; 26.2% of pixels brighten by more than 5 levels and 11.0% darken by more than 5.
REVIEW METHOD
Compare the same composition for local brightness, warmth, highlight clipping and material consistency.
SAMPLE LIMIT
One uncontrolled night portrait; no color chart, exposure metadata or calibrated-light reference.
REPRODUCE THE CHECK
Download the two published historical files and inspect them at their shared 512 × 768 dimensions; their original generation settings are unrecorded.
Compare skin, glasses, hair, shirt and bright signs for clipped highlights, color patches or flattened texture.
Use the separate September 7 controlled case for an actual tool rerun with its published source, recorded controls and runtime fingerprints.
01
What visibly changed
The face and shirt read brighter, skin appears warmer, and the street lighting has a more pronounced glow. The framing, glasses, hair and background pedestrians remain in corresponding positions, allowing a direct visual comparison.
02
What the pixel audit records
Across the two same-size files, mean luminance rises by 1.4 levels on a 0–255 scale. The average hides the local edit: 26.2 percent of pixels brighten by more than five levels while 11.0 percent darken by more than five. Near-white clipping falls from 0.75 to 0.67 percent in this artifact.
03
What needs restraint
Warmth is not the same as accurate skin tone, and brighter highlights can reduce facial texture. The output cannot reveal the true location, color or softness of lights that were not captured. It should be treated as a creative grade rather than recovered lighting data.
04
Why the historical portrait is repeated
The same historical reference also appears in the matting and anime artifact reviews. Reusing it provides a common visual subject, not a controlled experiment across tools. This review considers tonal placement and material appearance; other reviews use different criteria for selection boundaries or stylized detail.
05
How to review the treatment
Switch between source and result while watching eyes, teeth, skin boundaries, hair and bright signs. Bright skin beside unchanged dark hair, orange patches, gray teeth or lost highlight contrast are reasons to reduce the treatment or protect the affected region. Use a calibrated display when color consistency matters.
AUTHOR
Martin Delophy
Independent full-stack and algorithm engineer in China with 10 years of frontend, AI and audio/video development experience, including 5 years focused on AI. His open-source work covers browser AI, ONNX, WebGPU, Transformers, Stable Diffusion and local-first creative tools.